Tomato Seed Salad Dressing

Remember me telling you to save the tomato seeds and pulp in our last recipe? Well, now you will use it to make a wonderful salad dressing. There was about a cup of pulp from the five tomatoes we seeded. Here's the recipe for a wonderful dressing:

To the tomato pulp, add 1/3 cup of rice vinegar
1 1/2 cup of olive oil
1 teaspoon of Dijon mustard
1 tablespoon Worcestershire sauce
1 teaspoon of soy sauce
1 teaspoon of tomato paste
1/2 teaspoon of salt
1/4 teaspoon of ground pepper
couple of nice pinches of sugar

Add all ingredients in a jar with a lid and vigorously shake to mix completely. This makes about 3 cups of wonderful salad dressing. Store in the fridge for when you need it.

This salad dressing will work wonderful with chilled, steamed asparagus, as well as a simple salad of sliced heirloom tomatoes.  Enjoy!

THIS IS ......

RATATOUILLE


There are a couple of things that must be squared away before we create authentic Ratatouille. First and foremost, America, you have been mispronouncing the name, but it's not your fault. It amazes and baffles me that the creators and producers of the movie, "Ratatouille", can spend millions of dollars putting it together and then, along with their promoters, go on nationwide television and screw up the pronounciation. A bit of research and a French pocket dictionary would have clearly corrected the error. Alas, 300 million of you out there followed suit with what you were taught. So, in an effort to get everyone on the right track, here's the correct pronounciation...... it's simple.......do NOT pronounce the "e" at the end. It's not ratatouill ee.

Second, you have probably read recipes that call for the vegetables to be "diced" or cut in small pieces. This is totally wrong (unless you plan to use in an omelet). With the exception of the onions and garlic, the smallest pieces should be no less than one inch long. You want to see and decifer what each vegetable is. Dicing creates mushiness and breaking down the vegetables during cooking, thus causing the physical definition of the dish to be diminished. You certainly don't want it to become a puree.

Whew... glad we got that off our chests! Ratatouille (without the "e") is an incredible vegetable dish that has gained notoriety in the last few years with the release of the movie of the same name; however, in France it has been around for decades,  if not centuries. The fresh vegetables used, the preparation, the aromas during cooking, all transport you to the land where it originated and became famous, Provence, in the south of France.

This preparation is inspired by the world renown Chef Robuchon; however, I have found that adding one little secret ingredient takes it to the next level and really identifies with its origins. That ingredient is adding a splash of Anise liquor, such as Pernod or Ricard, when sauteing the onions. It adds a very subtle flavor to the dish. I do this with Paella reciipes as well.

Preparation is important when creating Ratatouille. Freshness is all important as well as cooking the main ingredient separately so that each vegetable presents its own unique flavor without being overpowered by the other. Since cooking locks in flavors, when all the ingredients are added together in the final stage, each ratains its own flavors. This is really a much simpler dish to make than you think. Here is what you need for a serving of 4:

10 tablespoons of good quality olive oil
1 large onion, finely chopped
1 green bell (or Italian) pepper, peeled and seeded (see below)
1 red pepper, peeled and seeded
1 yellow or orange pepper (optional), peeled and seeded
5 cloves of garlic, peeled and finely chopped
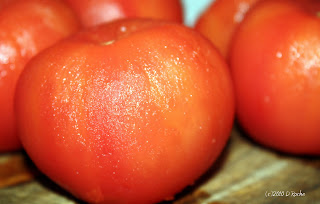
2 pounds of fresh vine ripened tomatoes, peeled and seeded (see below)
2 medium zuchinis
1 large (2 medium) eggplants
1 teaspoon of thyme
1 teaspoon of saffron threads
2 tablespoons of chopped fresh parsley
Splash of Anise liquor (Ricard or Pernod)
salt and pepper to taste.

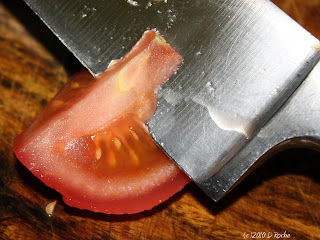
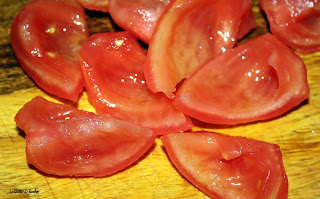
Peeling tomatoes and peppers are very easy to do. To peel tomatoes, bring a large pot of water to a boil. On the side, have a bowl of cold water with ice cubes. Set each tomato one at a time in the boiling water and count out about 15 to 20 seconds, quickly remove and set in the ice water for about 15 seconds. At the end where the stem was, take a knife or use your fingers to peel away the skin like you would a banana. The skin should easily peel off. To seed and depulp, simply cut the tomato in quarters. With a sharp knife, cut out the center vein and discard. Next, using your thumb, spoon out the seeds and pulp into a small bowl. Do not discard this nectar, we shall use it to make a wonderful salad dressing on the next post. Stay tuned on that one. Once your tomatoes are peeled and seeded, cut each quarter in half and set aside. You may make diagonal cuts if you wish. See illustrations on peeling, seeding, and cutting below.


To peel peppers is just as easy as with tomatoes. Preheat your oven to 400. Wash and dry the peppers and setting on a cookie sheet. Bake for about 35 minutes, turning the peppers every 10 minutes. Next, transfer peppers to a large bowl and quickly cover tightly with plastic wrap for about 20 minutes. Remove from bowl and at the stem, start peeling the skin off with your thumb and index finger. The skin should easily separate from the flesh. Don't fret if you don't get all the skin off. You should have no problems. Next, cut the peppers in quarters lengthwise, remove the seeds, and cut each quarter in half diagonally as you did with the tomatoes. Set aside.


Peel and chop your onion and garlic and set each aside. Wash your zuchini and cut each in half lengthwise. Leaving the peeling on, cut one inch pieces and set aside. Now you have all the ingredients,  with the exception of the eggplant, prepared and ready to cook. You will cut up your eggplant at the last minute so that it doesn't turn brown. You have just completed the most difficult part of preparing Ratatouille.

In a large pot, heat 4 tablespoons of olive oil over medium low heat, but do not let it smoke. Add the onions and saute gently for about 3 minutes. You are not looking to brown the onions, just get them translucent and sweating. Add the Anise liquor and continue to stir. Since, the peppers have been baked or "roasted", they are mostly cooked, so add them to the onions as well as the garlic. Add 2 pinches of salt and pepper and stir. Reduce heat to low, cover, and cook for about 5 minutes.

Your tomatoes will add moisture as they cook, so they are a great next addition to the pot. Stir them in and continue to cook, add another dash of salt and pepper, and cover. While ingredients are slow cooking, you will now prepare your zuchini and eggplant. With skin still on, cut your eggplant into one inch by 1/2 inch pieces and set aside.

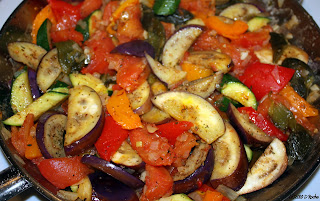
In a large frying pan, heat 2 tablespoons of olive oil for two minutes over medium low heat, but do not let it smoke. Add your zuchini and saute for about 4 minutes. Remove and set in a bowl. Return frying pan to the burner and heat 2 more tablespoons of olive oil. Saute the eggplant on medium heat for 4 minutes and then add the zuchini back to the pan. Sprinkle the thyme, 2 dashes of salt and pepper, and very gently, stir. Now add the zuchini and eggplant to the pot with the onions, add the saffron and parsley, and gently stir to incorporate all ingredients together as illustrated below. Reduce heat to low, cover, and cook for about 25 minutes.


When finished cooking, taste for salt and pepper, and stir in the final 2 tablespoons of olive oil. Plate the Ratatouille in a heated presentation dish, along with sliced olive and garlic bread loaf. Finish off with a lightly tossed salad of greens. Ratatouille can be served chilled as a first course the next day, with a drizzle of extra virgin olive oil. Either way, heated or chilled, this dish is wonderful. It makes a great entree for those of you that are vegetarian! Bon appetit!

Chorizo Mac n Cheese debuts in winner's circle

The Mac n Cheese is probably one of those dishes that everyone has one or more recipes that has been handed down from generation to generation in every family. There are probably as many recipe versions as there are people in the country. To top that all off, they're probably all great recipes too.

Well, with that said, growing up I can't remember mom ever making a mac n cheese dinner. And until now, I've rarely made it, apart from the box (you know what I mean) kind. So, the other day, I decided to come up with yet another recipe for this staple of the American diet. I think it must be recipe 300,000,001. I will call this, Chorizo Mac n Cheese. Go ahead and try it, it's easy. Let me know what you think. What you will need is:


2 cups of elbow macaroni pasta
3 chorizo links, casing removed (2/3 lb)
3 cups of chicken stock
1 1/2 cups of half n half
2 cups of shredded Mexican blend cheese
2 tablespoons of olive oil
6 tablespoons of butter
2 tablespoons of flour (sifted)
1/2 onion, finely chopped
1 large shallot, finely chopped
1/4 cup chopped parsley
1 1/2 cup Panko bread crumbs
1/2 teaspoon of salt
1/2 teaspoon of course ground pepper
1/2 teaspoon cayenne powder
1/4 teaspoon of garlic powder

Let's start out by doing our vegetable chopping, getting the chorizo ready, and the cheese grated (if you haven't done like me and just bought the packaged grated cheese). In a medium sized pot, melt one tablespoon of butter with the olive oil over medium heat. Add the onions, shallots, and chorizo and saute for about 5 or 6 minutes. Make sure you took the casing off the chorizo and cut up the meat into smaller chunks. Before you go to the next step, preheat your oven to 375.

Once the onions and shallots are translucent and beginning to brown, add 2 tablespoons of butter, allow to melt, then add the sifted flour making sure that it covers the onions and chorizo lightly, like new fallen snow. Now mix and stir so that flour is well incorporated and has coated all ingredients. Slowly start adding the chicken stock and stir. You will notice that the liquid will immediately thicken. Just keep adding the stock and make sure to stir (be sure to also scrape the bottom of the pan so it doesn't stick or burn).

Once all the chicken stock has been added, stir in the spices you have assembled EXCEPT for the garlic powder, then slowly add the half n half. At this time, it is good to mention that if you want to reduce the fat content, just use fat free half n half that can be found in most stores. Continue to stir until liquid returns to a simmer.

Now, add your macaroni and stir well. If you need a bit more liquid, just add another quarter cup of stock. Allow to cook for a couple of minutes at a slow boil (simmer), then add the cheese. Stir well so that cheese melts into the liquid and pasta. Be sure to use your spoon to scrape the bottom of the pan.

You now should have everything in the pot except the last 3 tablespoons of butter, the garlic powder, and the Panko bread crumbs. Take a baking dish and use some of the remaining butter to coat the dish. Pour the mac n cheese mixture into the baking dish and spread it out evenly. Transfer to the oven and bake for about 20 minutes uncovered.

While the mac n cheese is baking, melt the remaining butter in a fry pan under medium low heat. Next, add the Panko bread crumbs and coat them with the melted butter evenly. Sprinkle the garlic powder and stir. Once the bread crumbs are well coated and they just beginn to color, remove from heat.

After the mac n cheese has been baking for 20 minutes, take the dish out of the oven and sprinkle the Panko bread crumbs on top, taking care that it completely covers the surface. Return dish to the oven and finish baking at 375 for 10 more minutes. For the final 5 minutes, set the oven on broil so that the bread crumbs nicely brown. Remove dish from oven and let set uncovered for about 5 minutes. Then serve while still hot. Enjoy !!!

Cream of Leek and Potato Soup done my way

There's something to be said about the marriage of leeks and potatoes. The two go hand in hand so well that it doesn't many ingredients to create a dish that is both savory and velvety to the tongue. In fact, if ice cream was a soup, it would be Cream of Leek and Potato. Am I right?

I present to you my version and recipe for leek and potato soup and I have kicked it up a notch with a topping of crisp chunks of fried bacon. Oh my gosh, the combination will totally send you to soup heaven. OK, we could sit here and continue talking about it, but why not prepare it and try it for yourself. Let's get started. This recipe will serve a party of 4 comfortably.

2 large leek stalks
3 medium Russet potatoes
2 large shallots
3 cups of chicken stock (or vegetable)
1 cup of half n half
4 tablespoons of butter
2 tablespoons of olive oil
3 garlic cloves, peeled and crushed
1 teaspoon of salt
1/2 teaspoon of pepper
4 strips of unflavored bacon

This soup is very simple to make and one that will probably get you the biggest raves from your dinner guests. As with every recipe, we must do all our prep work. Start by taking your leeks and cut off the root area and about 2 inches off the top. Now starting at one end, starting cutting slices about 1/8 inch thick. When finished, rinse them well in a large bowl to get rid of all the dirt there may be. Drain and set aside. Be sure to save some of the slices for garnish as pictured above.

Take the shallots and finely chop them. In a pot, heat the oil and melt 2 tablespoons of the butter over medium heat. Add the shallots and occasionally stir. Cook shallots for about 4 minutes until they get nicely translucent. Next, add the leeks and stir well, continuing to cook for about another 5 minutes.

While the shallots and leeks are cooking, peel your potatoes and dice them in 1/2 inch squares. Peel and with your knife, crush the garlic cloves. Add the potatoes and garlic to the pot and stir. Add your salt and pepper. Continue to cook a few more minutes and add the chicken (or vegetable) stock. Bring to a slow boil and stir occasionally. Lower heat to low and cover allowing to slow cook for about 20 to 25 minutes.

Next, add the half n half and remainder of the butter. Bring to a slow boil and taste for flavor. If you need a bit more salt, you may add it now. Continue to cook on low for about 5 more minutes. Using a food processor, begin to process 4 ladles at a time for 2 minutes for every 4 ladles. Transfer to a large bowl. When all the soup has been processed, return it to the pot and simmer for a couple of minutes. The soup should be completely smooth and velvety with no clumps.

Chop the bacon in small 1/4 inch slices and saute over medium high heat in a frying pan until it gets nice and browned. Remove and let set on a paper towel to degrease. Serve the soup with some of the slices of leeks and top with the bacon bits. Serve hot and enjoy. As a side, a nice French baguette and a tossed salad of mixed greens or frise will complement very well. Bonne appetit!

Curry Poached Swai Filets guaranteed to become a favorite dish

The last time we talked about Swai Fish, it was Panko breaded and pan fried. There were rave reviews on its preparation and those that tried it wrote back to comment on how delicious and moist it was. Indeed, Swai is a wonderful fish that holds very well pan fried.

Well, if you enjoyed it pan fried, you will love it poached. Curry Poached Swai Fish will even convert those of you that may not be keen on fish that isn't fried, guaranteed. This preparation was started the day before with an overnight marination with coconut milk and curry powder. We first start out with the recipe for the marinade:

Prepare the night before:

1 can of coconut milk
1 teaspoon of sesame oil
2 teaspoons of good quality curry powder
1/4 teaspoon of tabasco sauce (no more than that!)
1 teaspoon of dried basil
1 teaspoon of dried tarragon
2 teaspoons of whole peppercorns (preferably red and green)
1 teaspoon of crushed garlic paste
3 teaspoons of capers
1/2 teaspoon of salt
1/2 teaspoon of crushed pepper

You will notice there is a melange of East and West flavors in this marinade. One might think the mix of these ingredients might not work. You will be very delighted as to how well they work. Prepare this the night before. Add all ingredients together in a bowl and blend thoroughly until everything is well mixed. Now add 2 large Swai filets making sure they are well coated and marinade completely covers the fish. Cover bowl with plastic wrap, transfer to the fridge and forget about it (until the next day).

This dish will take only 15 to 20 minutes to cook, so be sure that any starch you prepare is pretty much ready by the time the fish goes in the oven. Preheat your oven to 400. Spray or coat a shallow large baking dish with either cooking spray or sesame oil rubbed with a paper towel. Place each Swai filet side by side in the dish. You will notice the marinade will have solidified a great deal, which is normal. Now restir the remaining marinade until it is smooth and pour a tablespoon over each filet, paying special attention to include as much of the peppercorns and capers that were in the marinade.

Place the dish in the oven, uncovered, and reduce the heat slightly (to 380), bake for 20 minutes. When ready, serve each filet on a heated dinner plate with a side of asparagus and boiled baby red potatoes. At your liking, you may sprinkle some chopped parsley for garnish. Enjoy this wonderful way of serving not only Swai, but also Halibut filets, Snapper, and Cod. You may also bring the left over marinade to a slow boil, adding a few tablespoons of water or chicken stock and serve over the potatoes.

The most most perfectly cooked lentil you'll ever prepare

On several occasions, lentils has been featured on this site,  cooked as a stew, served as a side dish, or chilled as a salad. One of the characteristics of cooked lentils has always been that they tend to break down and don't retain their shape. The darker, green, French lentils work best in retaining shape, but will eventually break out of their casing, depending on how long you cook them. Wouldn't it be wonderful if you could cook them and they woudn't break down or get mushy, unless of course, you wanted to make a soup?

Well, the waiting is over and I have found a great way to turn out beautifully cooked lentils that will be present themselves well either hot or cilled. Using those darker green French lentils, bring 3 cups of water, salt, and a teaspoon of olive oil to a vigorous boil. Then add one cup of uncooked, rinsed, lentils to the water and bring back to a boil. Immediately cover and remove from heat. Allow the covered lentils to sit for 30 minutes. Do not uncover or check them at all during that time. After 30 minutes, taste a few of them for doneness. They should still be firm but cooked all the way through. Now, rinse them in cold water. You now have perfectly cooked lentils that are ready for serving as a salad or side dish.

Pictured here, are the lentils prepared as a salad with a drizzle of olive oil and rice vinegar. Sprinkle a dash of salt and pepper for taste. As a final touch, sprinkle with oven roasted almond slivers.You may, if you wish, microwave the lentils for a couple minutes and toss with a couple of tablespoons of melted butter.

If you are a lover of lentils, you are urged to try this method of cooking. You will not be disappointed. Be sure to use the French lentil version of this bean. Make quantities ahead of time and freeze what you don't use. You will always have some ready at a moment's notice when the need arises down the road.

Ground Pork and Chicken Gizzard Terrine gives one an inexpensive way to gourmet

Served hot or chilled with a spicy Dijon mustard, this pork and chicken terrine screams gourmet on a dime. If you can believe it, this two pound terrine cost less than $4.00 (EUR 3.00) to make and will serve as a first course for a dinner party of 8.

When grocery shopping, check out the "reduced" price section of your meat department. You'll be amazed as to some of the treasures you will find there. Don't be too proud to dig in and find yourself good quality cuts of pork, beef, chicken, and lamb. I'd stay away from the fish, however. This terrine was made with a one pound package of ground pork reduced to $1.28 (EUR 0.92) and a one pound package of fresh chicken gizzards reduced to $1.15 (EUR 0.85). Ground both up nicely, add great herbs and spices, throw it in the oven and voila, a dish created to satisfy the pickiest of snobby guests. And you don't even have to tell them what it cost. Let's create this all over again. Here's what we need:

1 lb ground pork
1 lb chicken gizzards
2 oz. of Brandy
1 egg yolk
1/2 cup fresh chopped parsley
2 tablespoons of capers
1 teaspoon of tomato paste
1 shallot, minced
3 cloves of garlic, minced
1 teaspoon basil
1 teaspoon tarragon
1/2 teaspoon garlic salt
1 teaspoon course ground black pepper
1 teaspoon salt
1/2 teaspoon Spanish Paprika
3 tablespoons olive oil

Using a food processor, process the gizzards until they are medium ground (medium ground means you still leave some small chunks). Add the shallots and grind just a few seconds longer.

In a saute pan, heat the olive oil over medium high heat and saute the gizzards and shallots for a few minutes and then add the brandy, stir and lower heat to medium low. Cook for about two more minutes but no more. Set aside and let cool. Preheat your oven to 400.

In a large bowl, add all the other ingredients and mix together well. Now add the gizzards and continue to mix until everything is well incorporated. Now transfer mixture to a well greased meat loaf dish. Take a strip of aluminum foil and cover the surface of the mixture and pat it down. You want to just cover the surface and not have the foil over the pan. Place in the oven and reduce heat to 325 and bake for 1 hour 40 minutes.

Remove from oven when finished and allow to sit for about 15 minutes. Now you can choose to either serve it hot or put it in the fridge and allow to chill. It's your choice, but no matter which you choose, it's delicious. If you want to chill it, you can take the juices from the pan, add a couple tablespoons of chicken stock (or water) and bit of gelatin powder and bring to a boil. Place the loaf back in the dish and pour the gelatin mixture back in and chill it. Cover it with plastic wrap so flavors stay pure.

If served chilled, serve with cornichons (baby pickles) and a bit of Dijon mustard, perhaps a small tossed salad of baby greens. Enjoy.

Pan Fried Rex Sole; so easy, so how can it taste so good?

One of my favorite fish of the sea, Rex Sole is often overlooked in favor of the more popular species of what is considered "flat fish". Don't make this mistake, this flat fish is absolutely delicious and so easy to prepare. If that weren't enough, it's very inexpensive. It's almost always available fresh at your local supermarket. For those of you residing in Europe, you're going to have to look it up online as to what it is called in your country. In the U.S., I simply call it good!

The easiest and and lip smacking way to prepare Rex Sole is to simply dredge it in flour and pan fry it over medium high heat until it is rendered to a golden crisp color. No need for a list of ingredients here, just add salt and pepper, 1/4 cup of olive oil and pan fry away. Finish it off with a lemon wedge at plating.

There is another wonderful thing to remember about Rex Sole (and most other flat fish), very few bones except for the backbone down the center of the fish. When ready to eat, simply take your knife and cut right down the length in the center of the fish and carefully separate the flesh with that knife. Once one side is complete, turn the fish over and repeat the process.

Serve this fish with steamed or boiled baby red potatoes, cut in wedges, and drizzle with a bit of melted butter. Garnish with chopped parsley. Doesn't that sound wonderful? And rather healthy, I might add. Butter isn't that bad for you in moderation. This is the time to moderate. As a finishing touch, serve a chilled plate of frisee lettuce with a lite vinegrette. There you go, I've just planned your dinner menu and I'm sure you won't regret it.

I offer my French Onion Soup as an apology for my absence...

Well, I must give all of my followers a big apology for my absence these past 3 weeks. I have been heavily involved with work and consequently have neglected this site that so many of you love. I am planning to better manage my time and devote regular hours during the week for updates and posting of new recipes. I hope that you all understand and that you can forgive me. With that said, I am presenting a brand new posting that I think you will love, Soupe a l'Onion (French Onion Soup).

My recipe for French Onion  Soup was recently served to my dinner guests who gave it rave reviews. They agreed that it was the best they had ever had. Perhaps my secret ingredient made all the difference. Read on and find out more.

This is probably one of the easiest soups to make and certainly one that will impress your dinner guests as it always does with mine. Soupe a l'Onion as it is called in France is a wonderful dish that doesn't call for a laundry list of ingredients or numerous steps in preparation. Most important, it doesn't take all day to make. Don't get me wrong, great Chefs will painstakingly take the time to make their beef stock from scratch; however, today there is wonderful pre made beef stock (or broth) available in your neighborhood market. Make sure that you purchase a good quality stock for this recipe as it will make all the difference if you choose not to make your own from scratch. One important thing that I should point out is the day before you make this savory dish, purchase a French Baguette and cut it in 1 inch pieces. Allow the bread pieces to dry in a paper bag overnight.

I mentioned earlier that in this recipe, there is a secret ingredient added that will take your French Onion Soup to a whole new level. Well, the suspense will be held no longer..... add 2 tablespoons of Worcestershire Sauce to your beef stock and you won't believe the difference it makes, guaranteed! OK, here's what we need for a serving for 4 dinner guests:

4 large yellow onions, roughly chopped
6 cloves of garlic, finely chopped
1 large shallot, finely chopped
1 French Baguette (previously cut in 1 inch pieces and dried)
12 to 16 oz. of grated Gruyere cheese (do not substitute)
3 tablespoons of olive oil
48 oz of beef stock (or broth)
salt and pepper to taste
2 tablespoons of Worcestershire Sauce
parsley for garnish

Have all your prep work done ahead of time as usual. This shouldn't take much time at all. In a large pan, heat the olive oil over medium heat. Add the onions, shallots, and garlic and saute, stirring frequently until onions are nicely translucent and beginning to caramelize. This enhances the flavor of the onion.

Now add the beef stock and bring to a boil. Reduce heat to low and slow cook for about 20 to 30 minutes, covered. Add your desired black pepper and taste to check for salt content. If you want it saltier, add a bit of it as well.  Preheat your oven to 425.

Gather 4 individual oven safe soup tureens and ladle enough of the soup to fill each tureen to 3/4 full. Add a layer of the bread, then a layer of the grated cheese. Finally, add a few more pieces of the bread at the center and finish off with additional grated cheese. Place on a cookie sheet and bake for about 15 minutes. For a finishing touch, set on broil for about 3 minutes. Remove from oven and garnish each tureen with some chopped parsley and serve hot.

A wonderful salad of greens tossed in a light French vinegrette dressing will make a wonderful compliment to this dish, along with a slightly chilled white Burgundy wine. Enjoy.